Tag Archives: primitive

Building Tab Four: Texture

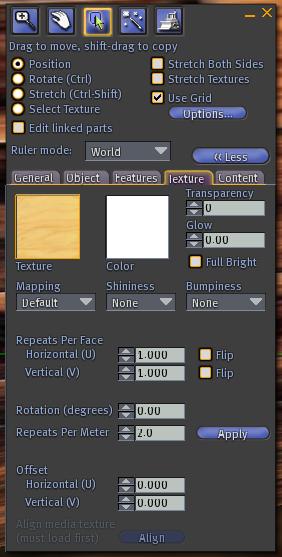
This is the texture tab on your build menu.

This is the texture tab on your build menu.

If you haven’t already, please see the Building Series Introduction so you have an idea about the organization of this and following posts.

The texture tab allows us to manipulate the textures on prims and objects. The first things we see here are “texture” and “color” so we’ll cover those and then move on through the rest of the tab.  I won’t cover every single detail, in the interest of keeping with the “beginner” level of this blog. If you want more information on something, try checking out the Second Life wikis. Now, the texture of a prim is basically an image that you want to display on its surface. To change this, simply click on the square that looks like a piece of wood. You’ll get a pop out menu that looks like:

Texture Menu

Texture Menu

.
.

.

.

This is basically a copy of everything in your inventory that can be used as a texture. (I’ve crossed out some folder names to protect the privacy of myself and friends.) If you want your object to be without a texture, select blank, underneath the texture preview. To select a texture from your inventory, just open a folder and click on the one you want. You’ll see a preview within the menu where the wood texture is showing now. After you get the texture you want, just click select. If at any time you wish the change back to the default texture, just open this menu again and click Default underneath the texture preview.

The color is simply the color you want the texture to be. Simply click on the box where it says “color” and you’ll get a menu that looks like:

Color Menu

Color Menu

.

You can select a color from the presets at the bottom of the menu. Or, you can use the palette you see, along with the shade selector on the right side. You can also play with the numbers on the left. If you create a new color that you don’t have in your presets, and want to keep it for future use, simply drag it from the larger preview box (on the left) down to one of the preset boxes. Doing this will replace the preset color with the color you just created. When you have the color you want, just hit select.

Now let’s move to the right on the texture menu and look at Transparency, Glow and Full Bright. These names are really pretty straightforward.  Transparency can be set from 0 to 100 and you can see these two extremes in the following image.

Transparency from 0 (left) to 100 (right).

Transparency from 0 (left) to 100 (right).

These views are from the build menu, so you’ll be able to see where the box is when it’s totally transparent. Otherwise, you won’t see it at all.

Now, let’s move on to Glow. This can be set from 0.0 to 1.0. It simply makes your object glow. :-) If you’d like more info, please see http://wiki.secondlife.com/wiki/Glow.

Next, we have Full Bright. This simply means that there will be no shading on your build. if you look closely at the transparency image, you’ll see the 0 transparency box has a darker side than top. If full bright were on, all sides would be the same shade as the top.

Let’s move on to Repeats Per Face. This simply tells the program how many times you want the same image to show up on each side of the prim.

1X1 (left) and 3X3 (right)

1X1 (left) and 3X3 (right)

.

.

.

.

To manipulate the texture more, you can use the rest of the options. Rotate the image, move it left, right, up, down, whatever. (Do this by playing with offset.) Have fun! :-)

**I will not be creating a post for the content tab for two reasons. The first is that content generally involves scripts and that is a bit more advanced than I’d like to go with this tutorial. The second is because there isn’t really a lot to say about the content tab. It’s just where you place things you wish to put inside the prim.

Leave a comment

Filed under How-To Guides for SL Beginners, Questions Answered

Building Tab Three: Features

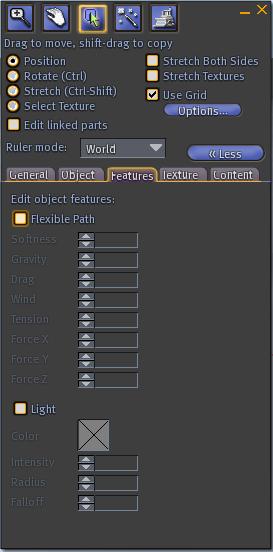
This is the "Features" tab on your build menu.

This is the "Features" tab on your build menu.

If you haven’t already, please see the Building Series Introduction so you have an idea about the organization of this and following posts.

The features tab has two basic features that you can edit. The first is “flexible path” and that will make it a flexible (flexi) prim. Common places to see flexi prims are hair and skirts. Flexi hair is a huge business within Second Life. Flexibility allows the hair to look much more realistic.

Now that you have an idea of what flexible path means, let’s explore your options. As in a previous post, I will play with some settings and post images to show you the effects. I’ll provide a brief explanation with the pictures. However, I’m not going to go through every single option because flexi prims are something that you need to experiment with. Just play around until you get the idea.

.

.

Softness is, in some ways, how flexible your prim will be. It's how smoothly the prim will flow.

Softness is, in some ways, how flexible your prim will be. It's how smoothly the prim will flow.

Graivity dictates how the prims weight will respond. This image shows a prim with a higher gravity value.

Graivity dictates how the prims weight will respond. This image shows a prim with a higher gravity value.

Wind will set the prim to respond to wind in the environment. Wind changes speeds and directions, which will make the prim flow differently at different times.

Wind will set the prim to respond to wind in the environment. Wind changes speeds and directions, which will make the prim flow differently at different times.

.

.

.

.

.

.

.

.

.

.

.

.

.

.

.

.

.

.

.

.

.

.

Now we have the Light option. This one is very simple. It allows you to turn a prim into a light source. (If you cannot see light sources, try changing the time of day to midnight. [World>Environment Settings>Midnight] If you still can’t see them then you probably need to change your graphics settings. [Edit>Preferences>Graphics])

This is what the menu and prim look like once you have added light.

This is what the menu and prim look like once you have added light.

The light feature options are pretty simple and straight-forward. You have light color, which is what color you want the light to emit. You have light intensity which ranges from 0.0 to 1.0. Next is radius. This basically determines how far the light will reach. This can range from 0.0 to 20.0. Last, you have falloff. This is basically how sharp the light edge will be. It’s kind of like

.lightfalloff

Now, that’s about all there is to the Features tab. Tab four coming soon. :-)

Leave a comment

Filed under How-To Guides for SL Beginners, Questions Answered

Building Tab Two: Object

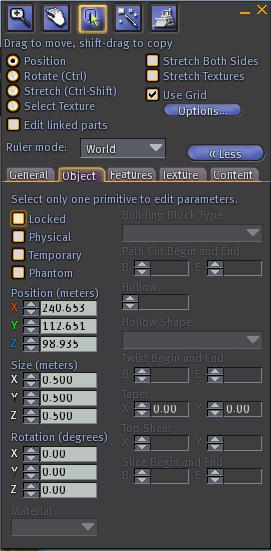
This is the object tab of your build menu.

This is the object tab of your build menu.

If you haven’t already, please see the Building Series Introduction so you have an idea about the organization of this and following posts.

OK. The Object tab. For this tab, we’re going to go down the left side and then we’ll go down the right side instead of trying to jump back and forth, doing the entire thing from top to bottom.

So first, we have the options

  • Locked: This locks the object in place, keeping anyone with modify permissions from moving or editing.
  • Physical: This subjects the object to gravity. This is great for objects such as balls, or anything you want to be able to move without editing. Beware though, you don’t have total control over where the object will go. When physical is turned on on an object, you can walk into it and “kick” it, you can click and drag it around (be very careful doing this because the faster you drag, the farther it will roll when the mouse is released).
  • Temporary: If you set an object to temporary, after you rez it again, it will disappear within approximately a minute. One use I’ve seen for this is volcano lava. The volcano shoots out lava and rock. The rocks disappear after a short period of time. (Go to http://slurl.com/secondlife/Ichelus/161/134/73 to check out the volcano.)
  • Phantom: This sets the object so that avatars and other objects may pass through it. For example, you may wish to make water phantom so it doesn’t look like you’re walking on it instead of in it. (If you’re linking phantom prims with non-phantom prims, the entire object will take on the property of the base prim. This means if you want the object to be phantom, link the prims in such a way that the base is phantom. If not, link them so that the base is not phantom.)

.

Now let’s move on to position. This (as nearly everything within Second Life) is measured in meters. You can dictate position up to 1/1000th of a meter. Position tells you where the objects will sit. You can use the arrows on the object to move it (click and drag them), you can use the arrows on your build menu that are located beside the numbers, or you can type in a number. I do not recommend typing numbers when you’re first starting out building. Wait until you have a better grasp on the size of your building area and the size of your objects or you may send them out into space and never find them again. Also, if you use the arrows that are on the objects, never use an arrow that is facing directly toward or away from your camera. If you do, your camera becomes very unstable, making it easy for the arrow to slip and for you to lose control. Again, the object might get lost, never to be found again. An easy way around this is to simply rotate your camera.

Next, we have size. Prims start out at 0.500 m on all axes. The smallest they can go is 0.010 m. Again, you can use the numbers, the arrows beside the numbers in the menu, or you can press and hold CTRL + SHIFT and click & drag one of the points that pop up around your prim.

Then comes rotation. You can rotate your prims on any or all of the three axes (X, Y, Z). You can use the numbers or the arrows on the menu with this too. You can also press and hold CTRL and click & drag one of the circles that pop up around your prim.

For any of the three of these, I suggest using your mouse if you’re building based on how you see it. For more precise builds, I suggest using the numbers.

At the bottom, we have material options. These options are wood (default), stone, metal, glass, flesh, plastic and rubber. Different materials have different properties in collisions. I find the best way to “see” these differences is to create a physical ball and play with the material. Try them all and you should see differences in how the ball reacts.

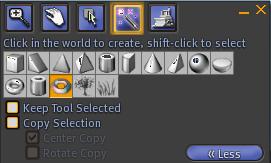
Now we move to the right side. First up is building block type. This is the basic shape of the prim. I’ll show you your options in the pictures below.

With the exception of trees and plants (which you won't be able to create unless you own the land) here are all the building block types.

With the exception of trees and plants (which you won't be able to create unless you own the land) here are all the building block types.

When you first click create or build, you get this pop up. Here you can also select different building blocks.

When you first click create or build, you get this pop up. Here you can also select different building blocks.

……

.

.

.

.

.

.

.

.

.

.

After you’ve selected and made sure of the shape you want, we move on to Path Cut. Basically, this cuts a small chunk out of the prim. Where exactly this will come from depends on the shape of the prim. I would suggest playing with the up and down arrows (slowly) instead of punching in numbers. Just play around with them a bit and watch how your prim changes.

Next, we have Hollow. This simply makes your prim hollow. You can decide how thick you want the “walls” of your prim to be. The smaller the hollow value, the thicker the prim.

You can also set hollow shapes. Basically, this is the shape of the hole. Have a look:

Hollow Shape Options

Hollow Shape Options

We also have more options listed below this. Depending upon which building block type you have selected you may have more or less options than are in my image. I’m only going to work with the ones that show on the “box” for now. Don’t be afraid to play with them to see what they do. A word to the wise however. If you’re seriously working on something, create a copy of it before you do any experimenting. A quick way to do this is press and hold SHIFT while you click and drag an arrow. You’ll see a brand new copy next to the old one. Also, instead of trying to explain to you what the options here do, I’m going to play with them a bit and give you pictures. It seems the easiest way for all of us because I’m sure no one would be able to understand my gibberish if I tried to explain these options.

Twisted to 180 degrees.

Twisted to 180 degrees.

Tapered to approx. 0.75

Tapered to approx. 0.75

Top Shear to 0.50

Top Shear to 0.50

Sliced to approx. 0.7. You could just as easily change the size of your prim. This keeps its size, but it appears smaller. This is useful for doors.

Sliced to approx. 0.7. You could just as easily change the size of your prim. This keeps its size, but it appears smaller. This is useful for doors.

.

.

.

.

.

.

.

.

.

.

.

.

.

.

.

.

.

.

.

.

..

.

.

.

.

.

.

.

.l..

l,

.

,

.

l


l

.


.

.

.

.

.


.

.

.

.

.

.


.

Building Tab Two: Features coming up next! :-)

Leave a comment

Filed under How-To Guides for SL Beginners, Questions Answered

Building Tab One: General

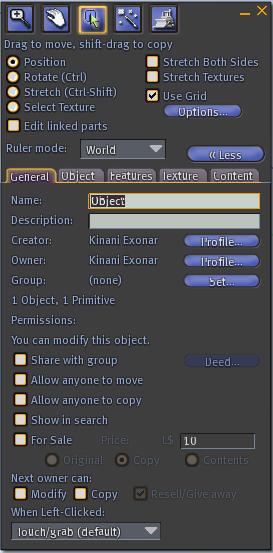
This is the "General" tab on your Build Menu

This is the "General" tab on your Build Menu

If you haven’t already, please see the Building Series Introduction so you have an idea about the organization of this and following posts.

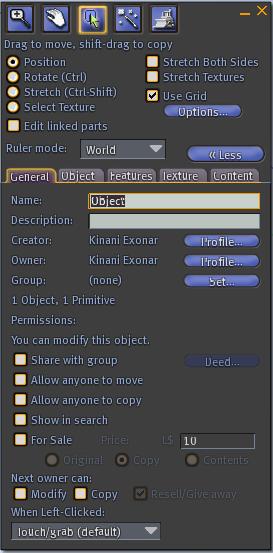
The General tab is just that. It contains the general information for the object you are working on. After you have rezzed an object, this is what you should see. If you don’t see this entire menu, just click on the More>> button. (It will be in the same place where the <<Less button is on this image.

The first things under the General tab are Name and Description. This is where you can type the name of your object and a description. For example, say you’re building an elephant statue. The name might be “Elephant” with a description like “With moving trunk and elephant sound”… This, of course, would be an advanced build, but it’s just the first thing that popped in my head as an example.

Under these, you will see Creator, Owner and Group. Creator and Owner are not changeable from this menu. The only way to change creator is to link your build to a prim created by someone else with the other prim as the base. Don’t worry about this yet. The owner will automatically change when/if you give someone a copy of your build. Your copy will still have you as the owner and their copy will list them as the owner. Group can be set, as you can see. Just click “Set…” and you will get a list of all the groups that you belong to. Simply select a group and there you go.

Under these, as you can see on the image, you have the number of objects selected and how many primitives are in said objects. To select multiple objects, press and hold CTRL while you click on the objects you want to select. This information is useful if you are on a prim limit and want your object to be under a set amount of prims. (To link prims as one object, select all the prims you want in the object and press CTRL + L. The last prim you select will become the base.)

Below this, you have your permissions. This will say either you can modify this object or you cannot modify this object. If you can modify the object (if you built it, you will always be able to modify it), then you will see all the options that are shown in the image. If you can’t, you will be more limited. Let’s look into your options.

  • Share with group. This will let you deed the object to one of your groups. To do this, just check the box and then click “Deed…” and choose a group.
  • Allow anyone to move. This means that any person who comes in contact with your object will be able to open the edit menu and move the object wherever they want. Use this cautiously.
  • Allow anyone to copy. This will set the object so that anyone can take a copy by right clicking and selecting “Take Copy” from their pie menu. If you want to give this object out free of charge, this is one way to do so. If you plan to charge others for this object, do not use this feature.
  • Show in search. This one’s pretty simple. This will set the object to show up when others search for it or use keywords related to it.
  • For Sale. If you want to sell this object, check the box and then type in a price. Select if you want to sell only the original object, copies of the object, or only its contents.

Below this you see “Next Owner Can:…” This is simply asking you what you want other people to be able to do with this object in the even that you give or sell them a copy. Select if you want them to be able to modify, copy or resell/transfer the object to someone else. Be careful with this. If you set it to allow them to do all three, they will have the power to do some dirty business.

Last but not least, we have what the object should do when people left-click on it. The default is “touch” and this will do nothing unless you have a script in it to react to touching. Other options from this drop-down are:

  • Sit on object (Which is good for chairs, etc.)
  • Buy Object
  • Pay object (Which is similar to buy, but can be used for donation boxes, etc. where the person paying will not receive anything for their $L)
  • Open (Which will bring up a menu allowing people to see what is inside the object and copy its contents to their inventory. This is good for selling things in boxes.)
  • Play and Open Parcel Media (These are used on areas that have media set to play, like music and videos.)

If you’re ready to move onto the next tab, please follow me. :-)

Leave a comment

Filed under How-To Guides for SL Beginners, Questions Answered

How To: Building (Let’s Make Something)

Here you can see what the building menu looks like, along with a very basic prim.

Here you can see what the building menu looks like, along with a very basic prim.

The following will (hopefully) give you a quick start on building. This is the first step in my building how to’s. I’ll do more in-depth things as we go on and maybe even one day get up to scripting, if I ever figure out how to script. :P But for now, this post assumes you have no prior knowledge (or very little) of building.

First thing, you need to know where your building menu is and what a primitive (prim) is. To access your build menu, simply click “Build” on the row of buttons at the bottom of your screen. You can also right-click on the ground and select “Create” from the pie menu that pops up. Make sure you are in an area that allows rezzing of objects. You cannot create objects in an area if you see a box at the top of your screen with a…nullset

.

.

.

.

A Primitive is a basic building block. It’s one piece of the puzzle that will become your final build. The box you see in the picture is a prim. Here are all the basic prims you can use to build. These may be twisted, stretched, turned, pulled, pushed….basically altered any way that you can think of. I’ve changed the color on some of them. The dark ones are objects, like a cylinder, that have holes through them.

prims

OK, let’s get started. After you build your first prim, you should see a menu that looks a little something like the one below.

It's intimidating at first, but it's really very simple.

It's intimidating at first, but it's really very simple.

Let’s work our way through these tabs, shall we? In the interest of readability, I’m going to create a post for each tab where I will explain the content. I’ll link all those posts back to this one for easy navigation.

Leave a comment

Filed under How-To Guides for SL Beginners, Questions Answered

512sqm Parcel For Rent or Sale

I have a 512sqm parcel up for grabs. Flexible price. Flat land with snow covering. If you buy, you will get full rights. If you rent, you will get some use of my larger land and skybox dance room.

http://slurl.com/secondlife/Blekinge/148/21/97

1 Comment

Filed under Uncategorized